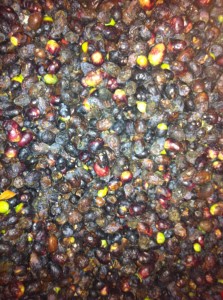
Here are some organic olives picked from a tree in Bel Air, Los Angeles. As you can see, some of them are still unripe and green, and some of them are turning black. I’m waiting for all the olives from the tree to go black, and then I’m going to dry cure them.
Olive trees are fairly familiar trees in home gardens across the world, from Southern California to South America, Australia and all the Mediterranean European countries. However, most olives grown on these beautiful trees remain uneaten, as people think of their home olive trees as ornamental trees. Not so! It’s easy to cure the olives grown on your tree. All you need is some salt and a little time…
There are many ways to cure olives, but here’s how I do it:
1. Pick your olives when they’re ripe and black.
2. Check them all to make sure they’re not bruised, damaged or rotting in any way.
3. Wash them and lay them out in a single layer on a towel so they can dry.
4. Weigh the olives. For every pound of fruit you will need a pound of raw fine ground sea salt or kosher salt.
5. Get two empty wooden fruit crates from your local farmers market or from any supermarket.
6. Line the crates with fabric such as burlap, hessian, cheesecloth or an old sheet. Nail the fabric in place, making sure the air will be able to circulate into the olives through the open slats in both boxes.
7. Pour a layer of salt at the bottom of one of the crates, then add a layer of olives. Keep layering the salt and the olives until everything is in the box.
8. Leave the crate outside in a dry, covered area for one week. Place the crate on a hard surface of some kind, and be aware that the crate is likely to leave a stain wherever it is.
9. After a week has passed, pour the contents of the crate into the second crate, then put it all back into crate number one by hand, olive by olive, checking each one as it goes for any mold or damage. Mold damage looks like white mildew… any olives which are looking even slightly suspicious need to be removed.
10. Repeat this selection process every three days to ensure nothing goes moldy, and to keep the salt and air mixing with the fruit.
11. The olives will be ready in 4-6 weeks. They’ll look black and shriveled and delicious, and the bitterness of the raw fruit fruit will be replaced by a delicious cured olives flavor!
12. If the olives seem a little tough, you can tenderize the waxy skins by blanching. Boil a pot of water, then using a slotted spoon, throw in the olives in small batches, allow to sit in the water for about 20 seconds, then remove with a slotted spoon. Don’t allow them to sit in the water longer than 30 seconds or else they’ll cook.
13. Lay the olives out to dry overnight.
14. Refrigerate and eat within six weeks if you can resist eating them all for that long, or alternatively they can be canned in brine or frozen.
Please let us know what you think by leaving a comment...
Like this page? Please link to us and let the world know!


Thanks for taking the trouble of sharing this – I was almost tempted to buy an olive bush just the other day but then thought.. ah, but I won’t be able to eat them. Now I know otherwise!
Posted by Nick on 13th October 2010 at 2:05 pm | Permalink
I have tried freezing olives but found that they lost all their flavours when defrosted.
Posted by Stand Mixers on 17th October 2010 at 8:16 am | Permalink
Does this hold for all olives?
Posted by Raman Aurora on 24th October 2010 at 7:55 am | Permalink
Hi Raman, This method is perfect for black olives, but doesn’t work so well for green olives. All black olives are good to go with this simple raw salt method though, as they’re ripe and ready to cure. Green ones need to be cooked in brine.
Freezing all types of olives changes the texture. The flavor should remain intact if they’re well sealed, but the texture will break down a be softer. Still good for sauces though… and hummus of course!
Posted by Ysanne Spevack on 24th October 2010 at 1:34 pm | Permalink
That is correct even peeled apples when put into freezer of it changes color. hahaha Yeah olives would be good for sauces
Happy Holloween
Posted by organic food delivered on 29th October 2010 at 11:35 am | Permalink
I didn’t know the method, is quite new for me but very helpful because I have to eat all the food uncooked.
Posted by Gina on 31st October 2010 at 2:35 pm | Permalink